Showing posts with label recipe. Show all posts

Sunday, August 31, 2014

No Cook Tomato Free Ketchup


I've been working on a tomato free ketchup for about a year now. I tried to base this on my tomato free sauce but it was a lot more work and wasn't quite as good as this one. I loosely based this on a couple of other recipes I found that contained pears, carrots and cranberry sauce. Pears have a gritty texture that remained in the final ketchup.

No Cook Tomato Free Ketchup
Originally, I was using corn syrup as I thought the sugar wouldn't dissolve fully. It is much better with the sugar and if you mix it with the vinegar it dissolves. Finally, if you don't want to use beet juice you can use 8-10 drops of red food coloring (but you can't taste the beets).

Ingredients:

1/3 cup vinegar
1/2 cup sugar

1 14oz can of yams (drained and reserved)
1 14oz can of cranberry sauce3 tsp salt
1/8 tsp allspice
1/8-1/16 tsp ground clove (less than two heads)
1 tsp onion powder
1/2 tsp garlic powder
1/2 tsp mustard powder

Juice from a 8oz can of beets (or red food coloring) as needed

How to make No Cook Tomato Free Ketchup:

Dissolve the sugar in the vinegar.

Drain the yams, reserving the liquid for later.

Place all ingredients except the beets/food coloring in a blender and blend until smooth. If needed add the reserved liquid from the yams in small amounts until you have the correct consistency.

Stir in beet juice in small amounts until you get the color you would like (I use less than half the liquid in an 8oz can). (If not using beet juice, 8-10 drops of food coloring should be about right.)

Chill before using.

Store in a sealed container in the refrigerator. (Each batch of mine lasts for months.)

Make 3.5-4 cups.

Other tomato free recipes you may be interested in:

Tomato Free Chicken Cacciatore Recipe

Mango, Cucumber, Jicama, and Avocado Salad Recipe

All other Tomato Free Recipes

Tuesday, May 6, 2014

Dairy Free Penne alla Vodka Recipe (Tomato Free/Gluten Free)


Penne alla vodka (or penne a la vodka if you prefer) is the trifecta of food intolerances for me: it's main ingredients are gluten, dairy, and tomato. I had tried making it years ago (when I was just gluten and dairy free) but I used soy milk. Soy milk has a very distinct flavor that is difficult to hide in any dish and my dairy free penne alla vodka was no exception.

Dairy free Penne alla Vodka (gluten free and tomato free)
I recently saw a coconut milk creamer in my local supermarket and decided to try again. Now plain coconut milk creamer (sold in a 16oz carton with the other coffee creamers) has a very slight coconut flavor to it, but that flavor (unlike the soy) was completely undetectable in the final dish.

Ingredients:

2 cloves garlic, chopped
1 tbsp olive oil
1/4 cup of vodka
1 cup plain coconut milk creamer*
1 pound gluten free penne
1 cup tomato free sauce**
1 small bunch fresh chopped basil***
Vegan Parmesan topping

* can also use soy milk creamer but coconut has a less noticeable flavor (both are found with the dairy coffee creamers; be sure they are unflavored/plain)
** substitute 1 cup tomato puree if not tomato free
*** omit if using tomato free sauce that has already been seasoned.

How to make dairy free penne alla vodka:

Saute two chopped cloves of garlic in olive oil in a large saute pan until starting to brown (about 5 minutes)

Measure 1/4 cup of vodka away from the stove. [WARNING: do not pour directly from vodka bottle into the pan as the bottle could catch fire and explode.] Add to the pan bring to a low boil. Boil for about 5 minutes.

Add the cup of coconut milk creamer, bring to a boil then lower to a simmer for about 20 minutes (sauce should reduce by about half).

While the sauce is simmering prepare the penne according to directions.

After the simmer, add 1 cup of tomato free sauce and the chopped basil. [Note, you can use the un-herbed sauce prior to step 7 or the finished sauce after step 8. If using the finished sauce, there is no need to add more basil here, but you can if you like.]

Cook until heated through (about 5 minutes) being careful to not overcook (the beets in the sauce will brown if you do).

Toss the cooked and drained pasta in the sauce and serve! Garnish with Vegan Parmesan topping if desired.

Other dairy free sauces (gluten and tomato free as well) you may be interested in:

Dairy Free Swedish Meatball Recipe

Dairy Free Alfredo Sauce Recipe

Or check my full list of recipes and the allergens they are free of.

Wednesday, August 28, 2013

Mango, Cucumber, Jicama, and Avocado Salad Recipe (vegan / gluten free)


I've made this salad a couple of times this summer for various cookouts and barbecues and it has been a hit at each. Jicama might be a little harder to find but a number of local supermarkets have had it for me.

Jicama, Mango, Cucumber, and Avocado Salad
Ingredients:

1 mango
1 medium cucumber
1 jicama
1 avocado

Dressing:

1 bunch cilantro, chopped
1/2" piece of ginger, grated
1 clove garlic, minced
1/4 cup olive oil
1 lemon
Salt and Pepper to taste

How to prepare Mango, Cucumber, and Jicama Salad:

Peel, pit and dice the mango.  (Keep dice size the same for all four fruits/veggies - somewhere between 1/4" and 1/2" should be fine.)

Peel and dice the cucumber.

Peel and dice the jicama.(sometimes jicama skin is too tough for my potato peeler if so, use a knife instead)

Pit, remove from skin and dice the avocado.

Combine mango, cucumber, jicama, avocado in a large bowl.

In a smaller bowl combine grated ginger, minced garlic, chopped cilanto, olive oil, juice of one lemon, salt and pepper.  Mix until combined being careful not to over mix.  [As a time saver I like to add my dressing ingredients to my magic bullet to both chop the herbs/spices and combine.  If you do this, don't add the lemon juice until after or it will emulsify and you'll have a mayonnaise more than a dressing!]

Pour over salad and toss.

Keep refrigerated until ready to serve.

Makes 4-6 side dish servings

Enjoy!


If you're looking for another great cookout recipe, you may want to try my Black Bean Quinoa Salad!

And don't forget to check my full list of Recipes (Gluten Free / Dairy Free / Allergens listed).


Thursday, June 6, 2013

Gluten Free Meatballs (dairy free too)


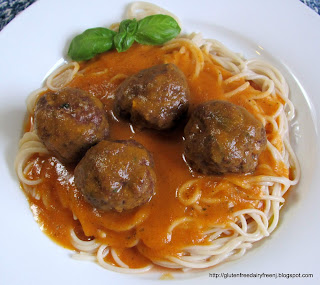
When I first put together my Tomato Free Sauce (recipe), I would make a batch of that and three pounds of gf meatballs. I’d make the first pound as Gluten Free Swedish Meatballs (recipe) and the other two would get added to the sauce.

I recently realized I never shared the standard gluten free meatball recipe, so here it is. You can bake them, fry them or simply simmer them in your sauce. Baking and frying will keep them held together better when you add them to the sauce and reduce the amount of time they need to simmer in the sauce. I prefer to bake them first as this cuts out the mess of frying.
Gluten Free Meatballs with Homemade Nomato Sauce
over Gluten Free Spaghetti

Ingredients:

1 pound ground beef
1 clove garlic, chopped fine
½ onion, chopped fine
Olive oil
¼ cup basil (1 tbsp dried)
¼ cup parsley (1 tbsp dried)
¼ gluten free bread crumbs (recipe)
Salt and pepper to taste

Optional:

1/4 vegan parmesan (or dairy)


How to prepare gluten free meatballs:

Preheat the oven to 350 if you are going to bake instead of fry.

Saute chopped onion and garlic in olive oil until translucent and just starting to brown (about 3 minutes).

In the mean time, finely chop the parsley and basil. (Quick note: the ¼ cup measurement assumes loosely packed prior to chopping. You’ll have much less afterwards.)

Add the bread crumbs, herbs, ground beef, salt, pepper, and onions and garlic (as soon as they are done) to a large mixing bowl (add vegan parmesan if using here as well). Mix thoroughly.

Form into 1” balls (about 1 tbsp worth) and set aside.

You can then fry the meatballs (in batches) until browned on all sides or for less mess, bake them in a 350 degree oven for 15-20 minutes.  (See below if adding directly to your sauce.)

Bring your favorite pasta sauce to a boil and add the browned (either oven or frying pan) meatballs then reduce to a simmer.  Continue to cook them until cooked all the way through and no longer pink in the center (20-30 minutes).

If you are not baking or frying make sure your sauce is boiling before adding the meatballs and that they are all completely covered in the pot. Turn the heat down to a simmer and cook until done (about an hour), not stirring for the first ½ hour so they don’t fall apart. I would use a meat thermometer to confirm they have reached an internal temp of 165 degrees in this case as well.

[NOTE: If using my no tomato pasta sauce, I like to add the meatballs prior to adding the pureed beets and then I don’t add the beets until the meatballs are done. Once you add the beets, if you cook them for more than 5 minutes or so they’ll begin to discolor.]

Serve with your favorite gluten free pasta!


Check out my other Gluten Free Recipes!

Wednesday, November 21, 2012

Gluten Free Gravy (Dairy Free)


This is how I make gluten free gravy. The final amount will depend on the amount of pan drippings you start with although I never measure these. I'd rather have too much gravy than not enough! You can easily scale this up as needed.  Some people strain the pan drippings and skim the fat which you are certainly welcome to do.

Gluten Free Gravy
Ingredients:

1 cup water + gluten free bullion or 1 cup gluten free chicken broth
1/2 cup water
Salt and Pepper
Pan drippings
1/4 cup gluten free flour mix

How to prepare gluten free gravy:

After removing the turkey / chicken from the roasting pan, tent it with foil and let it sit for 15 minutes. This makes it much easier to carve. While the bird is resting add 1 cup of water+bullion / gluten free broth to the pan juices for every four people and scrape up the roasted on bits.

In a container combine a gluten free flour mix* and 1/2 a cup of water. Seal the container and shake vigoursly.  Slowly whisk this mixture into the pan.  (Shaking in the container keeps lumps from forming, whisking in the mixture keeps it from solidifying immediately).  Bring to a boil and continue whisking until the gravy reaches the desired consistancy.  Season to taste.

*I usually combine what ever I have left over, usually, 1/3 cornstarch, 1/3 sorghum and 1/3 brown rice.

Depending on the amount of pan drippings you started with, this should make about 2 cups of gravy.  I figure on needing at least ¼ cup per person.

[One final note, the green flecks in the photo above is finely chopped spinach.  I can't digest green leafy vegetables so I run them through the blender and add them in in small doses where I can.]


Other gluten free / dairy free recipes:

Gluten Free Stuffing

Dairy Free Mashed Potatoes

Gluten Free Thanksgiving

Gluten Free Stuffing (dairy free / vegan depending on bread)


I figure on two slices of bread per serving and just like gravy, I'd rather have too much stuffing than not enough.  (I can't believe I just typed "too much stuffing", as if that's possible!)

Gluten Free Stuffing
Ingredients:

8 slices gluten free bread, cubed
1 medium onion, chopped
olive oil
1 tsp ground sage
salt and pepper to taste
1/2 cup almond milk + more as needed


How to prepare gluten free stuffing:

Preheat the oven to 300 degrees. 

Cube 8 slices of fresh gluten free bread.  (I save the ends of my gluten free loaves for just this purpose!)  Place the cubes on a cookies sheet and bake for 15-20 minutes, turning once.  [They should dry out, not brown.]  Allow to cool. [This can even be done the night before, just be sure they are totally cool before storing in a sealed bag.]

Saute the chopped onion in olive until starting to brown.  Toss the onions, seasonings and cooled cubes in a large bowl.  Moisten with almond milk (or any other nondairy milk or even chicken stock) stirring as you go, until bread is moist.

Heat the oven to 325 degrees.  Bake, covered, in a greased caserole dish for 30 minutes, then uncover and bake for an additional 15 minutes.

Serve and enjoy!


Other gluten free / dairy free recipes:

Gluten Free Gravy

Dairy Free Mashed Potatoes

Gluten Free Thanksgiving

Dairy Free Mashed Potatoes (Gluten Free / Vegan)


The secret to really good mashed potatoes is to fully cook the potatoes and whip them until past the point you think you should stop!
Dairy Free Mashed Potatoes

Ingredients:

1 pound potato peeled and quartered
2 tbsp olive oil
Almond milk as needed (about 1/4 cup)


How to prepare dairy free mashed potatoes:

Boil the potatoes until fork tender (about 25 minutes).  Drain the pan and begin to mash the potatoes either with a hand masher or with a mixer (turned off for now).  Moisten the potatoes with the olive oil and a small amount of the almond milk.  Begin to mash more vigoursly (or turn the electric mixer on) adding almond milk as you go until the potatoes reach the desired consistancy.  Remember you can always add more liquid, but you can't remove any! [Note: if you can't have almonds then try hemp milk. Rice milk will also work but it is thinner so you'll use less.]

I find that a pound of potatoes to start yields about 3 servings so adjust as needed.


Other gluten free / dairy free recipes:

Gluten Free Stuffing

Gluten Free Gravy

Gluten Free Thanksgiving

Sunday, May 20, 2012

Black Bean Quinoa Salad Recipe (naturally gluten free/dairy free/tomato free/vegan)


This is my go to salad for taking to picnics and cookouts. It is important that you make this salad in advance to allow the flavors to meld together. The day before or first thing morning of are best.

I have some additional tips as well. Unrinsed quinoa can be bitter and this is why some brands recommend rinsing before cooking. Frankly, it is well worth any price difference to purchase pre-rinsed quinoa. Keeping the red onion in the refrigerator until you need it will make it more mellow and easier on the eyes when you dice it. Finally, you can use any color bell pepper in this salad but yellow and orange have a much milder flavor than green or red and will make for a mellower salad.
GF/DF/Vegan Black Bean Quinoa Salad

Ingredients:

1 medium red onion, diced
1 cup quinoa
2 cans (15oz) of black beans, drained and rinsed
1 large yellow or orange bell pepper, diced
1 bunch of scallions sliced (1/4 inch pieces)

Dressing:

½ cup of olive oil
¼ cup lime juice (~1 large lime)
1 ½ tsp cumin
1 ½ tsp coriander
Salt and fresh ground pepper to taste
½ - 1 cup fresh cilantro, unpacked (~1 bunch, stems removed)

How to prepare a Black Bean Quinoa Salad:

Dice the red onion, rinse thoroughly, add to a bowl, cover with water and store in refrigerator until needed.


Prepare the quinoa according to package directions. When done (including any recommended post cooking time sitting in the covered pot) transfer to a large bowl and allow to cool. Occasionally fluff again to assist the cooling.

While quinoa is cooling, drain and rinse beans, dice the bell pepper, chop the scallions.

Drain the red onion and rinse with cold water again.

Mix the diced red onion, diced bell pepper, rinsed beans, chopped scallions into the quinoa.

For the dressing, combine all ingredients in blender or magic bullet cup. Blend until cilantro is chopped and dressing is emulsified. (You could easily mix by hand but then you’ll need to chop the cilantro - this saves that step.)

Stir in the dressing, cover and refrigerate up to one day until needed.

Allow to come to room temperature and taste one last time for seasoning before serving.

Enjoy!


Other recipes you may enjoy:

Tomato Free Salsa

Click here for more Vegan Recipes

Click here for a full list of Recipes (gluten free / dairy free / allergens listed)

Wednesday, March 28, 2012

Gluten Free / Dairy Free Chicken Alfredo Recipe


This uses the vegan alfredo sauce recipe I previously posted. I’ve included all of the ingredients and instructions here so you don’t have to refer to two separate posts.

Gluten Free / Dairy Free Chicken Alfredo
with Asparagus and Artichoke Hearts

I intended to include some left over sliced black olives that I had but they had gone bad. I’ve also come to realize that I don’t particularly like artichoke hearts! It doesn’t matter really; you can easily substitute any vegetable you like for the asparagus or in addition to it. Just make sure it is cooked but firm when you add it in!

Ingredients:
16oz Gluten Free Pasta
1 pound asparagus
1 medium onion, chopped
1 ½ pounds of boneless chicken cut into 1” pieces
12oz jar unmarinated artichoke hearts
8oz can sliced black olives
6 Tbsp olive oil
4 Tbsp Gluten Free flour (any blend should work)
6 Tbsp Vegan Parmesan Cheese
2 cups almond milk (you could also use hemp or rice milk but rice milk will take longer to thicken)

How to prepare GF/DF Chicken Alfredo:
Wash the asparagus making sure to rinse any sand from the tips.  Cut (and discard) the woody part off the bottom of the asparagus (about 2") and then cut into roughly 2" pieces keeping the tips separate.

Chop the onion.

Set a pot of water to boil for the pasta. (When it comes to a boil add the pasta and cook until al dente – I usually start testing around 6 minutes as I’ve yet to find a GF pasta whose cooking times are correct on the package! I would try to start the pasta about the time the chicken was done browning)


In a large pan, sauté the onion until beginning to brown. Remove and set aside.

Set a second smaller pot of water to boil for the asparagus.

Sauté the chicken pieces in the sauté pan until browned. Remove and set aside.

Boil the asparagus stalks for six minutes and the tips for four minutes (add them to the pot 2 minutes after the stalks) but want to time them to finish about the same time as the sauce thickens below.)

Heat the 6 Tbsp of olive oil over medium heat in the sauté pan.  Add the gluten free flour blend and stir until it starts to brown.  Add the vegan Parmesan and almond (hemp/rice) milk while continuing to stir.

Return the chicken and onion to the sauté pan and add the artichoke hearts and olives. Allow the sauce to thicken, stirring occasionally. Add the asparagus when it finishes cooking. If the sauce finishes thickening before the pasta is done, remove from heat until pasta is done (you'll need to reheat it once the pasta is ready).

Serve over pasta.

Makes 4-6 servings.

Note: If you are relatively sure of the cooking time of your pasta you could cook the asparagus in the same pot. Just keep in mind that adding the room temperature stalks and later the tips will drop the temperature of the water and perhaps delay the pasta’s finish time slightly.


Other Gluten Free / Dairy Free Recipes You May Enjoy:

Gluten Free / Dairy Free Stuffed Shells Recipe

Dairy Free / Gluten Free Chicken and Rice Recipe

Sunday, March 4, 2012

Tomato Free Jambalaya Recipe (gluten free / dairy free)


The andoulli sausage really gives this dish a bit of a kick. If you prefer less spice use a milder sausage and/or cut the amount of cayenne pepper.  I am pork free as well. Bilinski makes a chicken andoulli sausage that is gluten and dairy free. Using my tomato free sauce recipe has opened up yet another dinner option.

Tomato Free Jambalaya (gluten free / dairy free / pork free)
Ingredients:
Olive oil
1 medium green bell pepper, chopped
1 medium onion, chopped
1 stalk celery, chopped
1/2 # andoulli sausage, sliced 1/4"
1 tbsp minced garlic
1 cup long-grain rice
1 tablespoon dried parsley
1 teaspoon paprika
1/2 teaspoon dried thyme
1/2 teaspoon cayenne pepper
1/2 teaspoon oregano
1/2 teaspoon ground black pepper
1/4 teaspoon salt
1 bay leaf
2 1/2 cups chicken stock
1 # medium, shrimp, peeled and deveined
2 cups no tomato sauce (or 1 14oz can diced tomatoes plus 1 cup tomato sauce)
4 scallions, sliced

How to prepare Tomato Free Jambalaya:
In large pot/dutch oven, sauté the andoulli sausage until beginning to brown (if using Bilinski chicken sausage you may need to add a touch of oil; pork sausage should fry fine in its own fat).


Add the onion, green bell pepper, and celery and continue sautéing for another 3 minutes (add more oil if needed). Next add the garlic and continue until the vegetables are starting to brown (about 5 minutes more).

Stir in the rice, spices, salt & pepper, bay leaf, and stock. (If using tomatoes/tomato sauce add here as well). Bring mixture to a boil over medium-high heat. Cover, reduce heat and let simmer for 20 minutes.

Add the shrimp and tuck under the rice. Cook for 2-3 minutes. Add the tomato free sauce and the scallions. Cook for an additional 2 to 3 minutes or until the shrimp are pink and fully cooked and the tomato free sauce is heated through.

[This end cooking time is very dependent on the size of your shrimp. The bigger they are the longer they will need. Increase the amount of time they cook PRIOR to adding the tomato free sauce. If you increase the amount of time the sauce cooks, the beets will turn the sauce brown.]

Tip: I freeze portions of everything I make for later lunches. I find that long grain rice really doesn't freeze well and instead use medium grain (one for one substitute) which holds up much better when reheated. If you do so as well, increase the amount of stock by 1/2 a cup.

Enjoy!


If you like this recipe you may want to try my Tomato Free Chicken Cacciatore Recipe
or browse my full list of Tomato Free Recipes.  (I also have a list of Nightshade Free Recipes and Acid Reflux / Heartburn / GERD Friendly Recipes.)

Wednesday, February 1, 2012

Karina's Chicken Chili with White Beans, Sweet Potato, and Lime


I had some sweet potatoes left over this weekend that I had intended to turn into Karina's African Sweet Potato Soup (with three types of beans, peppers, onions, spices) some night this week.  That is until I saw that Karina had a new sweet potato recipe on her blog:  Karina's Chicken Chili with White Beans, Sweet Potato and Lime.

Karina's Chicken Chili with Sweet Potato, White Beans and Lime
Her photo and description really made this sound wonderful.  I had to fight the urge to make this Sunday night instead of working on my upcoming Tomato Free Jambalaya recipe (due out soon).  I did however get to make it last night and it was every bit as good as I imagined it would be (even though my photo isn't nearly as vibrant as hers was!).

I had it again for lunch today at work (one of the joys of living alone, lots of left overs) and still have three more meals in the freezer.  It was just as good this afternoon as it was last night.  This recipe has definitely earned its place in my rotation of favorites!

On final thought, I tagged this article as vegan even though the recipe calls for roast chicken.  I think it would be wonderful without the chicken as well.  Just swap out the chicken stock for vegetable stock, omit the chicken, and you're all set!


Other recipes on my favorites list (in addition to the two Karina recipes above):

GF/DF/Tomato Free Chicken Cacciatore

GF/DF Chicken and Rice/Arroz con Pollo (only 1 Tbsp of tomato paste, that can easily be left out)

GF/DF Turkey Cutlets

My full list of recipes on the site is here: Allergen Free / Friendly Recipes

And a list of my tomato free recipes is here: Recipes without Tomato (includes chili, salsa, jambalaya and spaghetti sauce)

Sunday, January 22, 2012

Dairy Free / Gluten Free Turkey Cutlets


This was one of my favorite meals growing up and the first thing I learned how to cook. It converted to GF/DF pretty easily – use gf bread crumbs and sub out olive oil instead of butter. I like it best with a side of fettuccine in dairy free alfredo sauce.

This can also be made egg free by substituting 3 tbps of plain soy yogurt plus a tsp of water instead of the egg.

Dairy Free / Gluten Free Turkey Cutlets served over rice
Ingredients:
1 egg (or 3 Tbsp soy yogurt + 1 tsp water)
1/2 cup GF bread crumbs
1 pound Turkey Cutlets
1/4 cup olive oil
1 cup water
2 tsp gf chicken bullion

How to prepare gluten free turkey cutlets:

Add egg to a shallow pan or dish and beat with a whisk. (Or mix 3 Tbsp soy yogurt and 1 tsp of water if going egg free.)

Add gf/df bread crumbs to a second pan.

Dip each turkey cutlet in the egg (or yogurt mixture) and then in the gf bread crumbs to coat. Set aside.

Heat oil in a large frying pan over medium heat. Add the cutlets and brown on each side (about 3 minutes a side). If they don't all fit at once; fry them in batches.

Return the browned cutlets to the pan and add the water and bullion. Bring the water to a boil and then lower the heat and simmer covered for 30 minutes (or more) until tender. If the cutlets are not fully covered by the water, rotate the cutlets (top to bottom) at least once during this simmer.

Serve covered with the juice from the pan. Enjoy!

Serves 4.


Other recipes you may enjoy:

Dairy Free / Gluten Free Swedish Meatballs in Sauce

Dairy Free / Gluten Free Chicken and Rice

Sunday, December 18, 2011

Dairy Free / Gluten Free Swedish Meatball Recipe


I started making Swedish meatballs years ago after realizing that tomato sauce doesn’t really work for me. Now that I have a Tomato Free Sauce, I get to have spaghetti and meatballs again but I like to make Swedish meatballs as well.

A couple of quick notes on the recipe:

If you can have dairy replace the almond/hemp milk with heavy cream. If you are DF don’t use rice milk as it is too thin. If you have to, then you may want to add a little additional flour to the gravy.

Why add bread/bread crumbs to meatballs? It turns out, bread or bread crumbs in meatballs makes them significantly softer. In this recipe, use a middle slice of bread, not the end (I usually save the ends of GF bread to make bread crumbs) as the end may not fall apart as easily.


Gluten Free / Dairy Free Swedish Meatballs
 Ingredients:
1 slice gf bread
1/4 cup almond/hemp milk
olive oil
1 medium white onion, chopped fine

1# ground beef
1/4 tsp allspice
1/4 tsp nutmeg
1 tbsp dried parsley
salt and pepper to taste


Gravy Ingredients:
1/4 cup almond/hemp milk
2 cups gluten free beef broth
1/4 cup gluten free flour mix
dash nutmeg
dash allspice
1 tbsp lemon juice
salt and pepper to taste

Jam:
Lingonberry, (cranberry, currant, blackberry, raspberry)

How to prepare GF/DF Swedish Meatballs:
Soak bread in milk using the bare minimum of milk (you can always add more).

Sauté chopped onion in olive oil (about 3-4 minutes) in a high rimmed sauté pan.


Whisk milk/bread mixture until bread fully falls apart (again adding more milk as needed).

Mix bread/milk ingredients, onions, ground beef, allspice, nutmeg, parsley, salt and pepper in a large bowl. Form into 1” meatballs (recipe should make 20-24). If you used too much milk on the bread the meatballs may not hold their shape well. If so, cool in the freezer for 15-20 minutes.

Fry meatballs in batches until browned on the outside, transfer to a paper towel lined plate as done.

Drain off some fat as needed/desired.

To make the gravy:
Combine the milk and gf flour in a covered container and shake well. Deglaze the sauté pan with a bit of the beef stock/broth before adding the rest. Stir in the flour/milk mixture. Add the nutmeg, allspice, lemon juice, salt and pepper.

Return meatballs to pan and simmer until gravy is desired consistency and meatballs are cooked fully through.

Serve over Gluten Free noodles with a bit of jam (lingonberry is traditional, but currant, cranberry, blackberry or raspberry jam can all be used in a pinch.)

Enjoy!

Note: the jam can be mixed into the gravy as well.

If you make this recipe and enjoy it, let me know in the comments below!

Wednesday, November 30, 2011

Tomato Free / Gluten Free Chicken Cacciatore Recipe (naturally dairy free as well)


I recently put together this TF Chicken Cacciatore recipe and it was such a success I thought I’d share. I used a jar of unmarinated roasted red peppers, but I’m sure you could roast your own if you preferred. I’m just not sure how many you’d need - the 32oz jar gave me 4 cups of puree. I think if I were to roast my own, I might try roasting the onions as well.

Tomato Free Chicken Cacciatore
Ingredients:
1 jar (32 oz) plain roasted red peppers
1 tbsp dried basil
1 tbsp dried oregano
Salt and pepper to taste

2 tbps olive oil
4 chicken breasts (about 1.5 pounds) cubed
1 large yellow onion chopped
2 large green bell pepper chopped
4 cloves garlic, diced
(1 cup sliced mushrooms, optional)

1/2 cup dry white wine
1 bay leaf

How to prepare:
Add peppers from jar to blender being careful to remove any seeds. Add some of the liquid from the jar as well and puree (remember you can always add more liquid if needed). [Note: add all the seasonings except the bay leaf here to blend them in well.]

Brown chicken in the olive oil and then remove from the pan.


Next, brown the onion, garlic and peppers and when done, remove them from pan as well. [I'm not a big fan of mushrooms so I don't include them. If you'd like to add them, do so here.]

Deglaze the pan with the white wine. Stir in the seasoned red pepper puree.

Return the chicken and vegetables to the pan. Add the bay leaf and cover. [If you didn’t blend in the seasonings at the beginning, add them here.]

Simmer until chicken is tender and cooked through about 30 minutes. [If you choose to use whole chicken pieces (bone-in or boneless) you may need to adjust the cooking time until the chicken is properly cooked through.]

Discard bay leaf and server over hot gf pasta or rice.

Serves 5.

If you try this recipe and have success please let me know by leaving a comment below!


Other recipes you may enjoy:

Gluten Free / Dairy Free Chicken and Rice Recipe (Arroz con Pollo) – if needed you can omit the tomato paste or replace it with a little red pepper paste instead.

Tomato Free Chili Recipe

Click here for more No Tomato Recipes

And click here for more Heartburn/GERD/Acid Reflux Friendly Recipes

Wednesday, November 2, 2011

Gluten Free / Dairy Free Lasagna Recipe (easily made vegan and tomato free)


I’ve been making this GF/DF lasagna for a couple of years now. I started off with DeBoles no boil noodles but this was at a time when I was still eating tomato sauce (albeit very little) and there wasn’t enough moisture in my pan to fully cook the noodles (I only used about a ½ cup total). That first attempt came out ‘crunchy’. When was the last time you used ‘crunchy’ to describe a really good lasagna? Nope, me neither.

GF / DF / Vegan Lasagna (with Tomato Free Sauce)
I’ve since tried making this with Tinkyada noodles as well as the DeBoles but this time boiling them a bit first. Both were fine but some challenges remained. First, if you use the Tinkyada, the 15-16 minutes recommended on the package is delusional – try about 10 minutes or less (remember they’ll continue cooking in the oven). Second, the both brands are 10” long so if you pan is shorter, you’ll have to cut them (my current pan is 10” by 14” but my original was 8”x8”). Finally, these noodles tend to stick together while cooking especially if you don’t have a big enough pot. I had been cooking them in batches in a 12” sauté pan but that just adds to the time and complexity.

The last time I made a big batch of No Tomato Pasta Sauce. I set aside enough to try this recipe again, only this time using the DeBoles and not boiling them. This recipe will work with regular Tomato sauce or my tomato free sauce.  It is vegan as written and only contains meat if you want it to (or serve it with meatballs).

Ingredients:
1 cup sauce (Tomato or Tomato-Free Sauce)
1 box gluten free lasagna noodles (DeBoles or Tinkyada) 10oz
1 block Vegan Gourmet Mozzarella Cheese (enough shredded to cover top, about 1/3 to 1/2 the block)

Tofu Mixture:
1 package silken tofu (14oz)
1 cup sauce (Tomato or Tomato-Free Sauce)
1 tbsp dried parsley
1 tsp dried basil
½ tsp garlic powder
¼ tsp oregano
Salt and pepper to taste
½ cup shredded spinach (optional)


How to prepare:
If using Tinkyada, boil the noodles for 10 minutes (Tinkyada says 15-16 min but this is way too long) or until done. Drain, rinse with cold water and lay out flat before they crumple and/or stick together.

If using DeBoles No Boil, skip the previous step.

Meanwhile, in a large mixing bowl combine the tofu, 1 cup of sauce, parsley, basil, garlic powder, oregano, salt and pepper (include optional shredded spinach if using). Hint: crumble the dry spices in the palm of your hand before adding to increase their flavor. Use a spoon and stir the tofu mixture until it resembles the ricotta cheese filling of real lasagna. (Do not use shredded mozzarella in the mixture; it will not melt like real mozzarella unless it is broiled on top.) [Notes: don’t over stir or the mixture will become too smooth. If using soft tofu, a whisk may be easier to use to get the correct consistency.]

Preheat the oven to 375. (350 for No Boil.)

Coat the bottom of a lasagna pan with 1/2 cup of sauce.

When the noodles are ready, add a single layer to the pan topped by a layer of the tofu mixture (I used about 2 heaping tbsp of mixture per noodle). Alternate layers until you are out of noodles (hint preserve some of the better [unbroken] noodles for the top). Spread the remaining 1/2 cup of sauce on the top layer of noodles. Bake covered at 375 for 20-30 minutes until heated through. (Or if using No Boil, bake covered at 350 for 40-60 minutes. Start checking at 40 minutes for doneness.)

Remove from the oven and cover with shredded soy mozzarella. Place under the broiler and broil – watching carefully until shredded cheese begins to bubble. Remove promptly once the cheese is melted as shortly thereafter it will blacken and then burn. [Warning, if you bake the soy mozzarella on top of the lasagna it may dry out and not melt as much when you broil it, it is better to add after baking.] [You can also use Daiya Shredded Mozzarella, if so, uncover and add for the last 5-10 minutes of baking.]

One final note, I’ve been pre-melting my Vegan Gourmet in the microwave and then drizzling it over what I’m making. I find this works best for things that aren’t oven baked – cheese steaks, tacos, nachos, etc. I think the next time I make this, baked ziti, or stuffed shells, I’m going to stick to broiling it.

Enjoy!

Variations:

Meat Lasagna – include cooked ground beef either in the tofu mixture or in a layer on top of the lasagna but below the shredded cheese.

Baked Ziti – I use this same tofu mixture tossed with cooked pasta (ziti, etc) to make Gluten Free / Dairy Free / Vegan Baked Ziti 

Lasagna rolls – Haven’t tried this yet but should be able to use the tofu mixture in individually rolled Lasagna noodles. Obviously, this won’t work with No Boil Noodles!

Stuffed Shells – I also use pretty much this same recipe for Gluten Free / Vegan / Dairy Free Stuffed Shells

Recipe Pages:


All of the recipes on this site are listed here: Gluten Free Recipes flagged by allergen, but you may also be interested in my listing of Vegan Recipes and/or my list of Dairy Free Recipes (that you'd expect to contain dairy).

If you try this recipe and have success please let me know by leaving a comment below!

Wednesday, August 31, 2011

Tomato Free Salsa Recipe (naturally gluten free / dairy free / vegan as well)


For years my friends mocked me for how I ate chips and salsa. Since I can’t really tolerate tomatoes, I would just dip the corner of the chip and allow almost all of the salsa to fall off it – mostly getting but a bit of flavor. By adding this tomato free sauce (before adding the Italian seasonings) into the recipe below, I can enjoy salsa normally – by the full chip full!  Like most salsa, this recipe is gluten free, dairy free, and vegan.

Tomato Free Salsa (gluten free/dairy free/vegan)
Ingredients:
½ onion diced
1 bell pepper, diced
3 jalapeño peppers, seeded, diced
1 lime (juice)
½ cup cilantro, chopped
Salt and Pepper to taste

How to prepare:
Dice the onion and bell pepper (your choice of color, I used red). Carefully seed the jalapeños and dice them. (Do not touch the peppers with your bare hands, use gloves or a fork. Immediately wash your hands afterwards and avoid touching your eyes. The seeds can optionally be added into the tomato free salsa if you prefer it to have more heat.)

Add the cup of tomato-free sauce (unseasoned as noted in that recipe), the chopped cilantro, and the juice of one lime. Season with salt and pepper then mix thoroughly. Taste and adjust seasoning as needed.

Prepare in advance and allow to sit so flavors can meld together.

Serve with tortilla chips or use with your favorite Mexican/Southwest dish – tacos, burritos, quesadillas, etc.

Enjoy!

Thursday, August 25, 2011

Tomato Free Chili Recipe (Gluten Free / Dairy Free as well)


I'm slowly returning to the dishes I had to give up when my tomato intolerance got too severe.  I'm also trying to increase the amount of vegetables I consume so this has quite a bit more bell pepper and beans than other chili recipes.  Up next will be a Tomato Free Salsa Recipe.
Tomato Free / Dairy Free / Gluten Free Chili
Over Tortilla Chips with Melted Vegan Gourmet Cheddar

Chili (with or without tomato) is naturally gluten free and dairy free (depending on whether or not you add cheese and if so, whether or not it is vegan cheese) but you can modify this however it suits your tastes.  This can also be used to make tomato free chili dogs and tomato free nachos!

Ingredients:
1 pound ground beef
1 large onion, well chopped
2 green bell peppers, well chopped
2 cloves of garlic, chopped fine
2 - 15oz cans of dark red kidney beans
2-3 tbsp of chili powder
Salt and pepper to taste
2 cups of tomato free sauce (or plain tomato sauce if you can)
¼ cup fresh basil chopped (exclude if nomato/tomato sauce contains basil)

How to prepare no tomato chili:
Sauté the ground beef, onion, green bell pepper, and garlic until onion is tender and beef is beginning to brown. Drain off the fat from the meat.

Add the contents of the cans of beans (if you drain and rinse them then add a ½ cup of water as well, if you don’t drain them, try to avoid the sediment at the bottom of the cans). Add the chili powder, basil, salt, pepper and if using tomato sauce (see directions below if using tomato free sauce). Bring to a boil, then reduce to a simmer. Simmer, covered for 20 minutes.

[If using tomato free sauce that contains beets, simmer without the sauce for 15 minutes, then add the no tomato sauce, stir it in, and finish simmering for another 5 minutes. Beets will turn brown if cooked too long.]

Serve over plain white rice.

Wednesday, August 17, 2011

Gluten Free Dairy Free Baked Ziti Recipe (vegan)


This recipe is very similar to my Gluten Free Dairy Free Stuffed Shells (vegan) recipe.  If you'd like it to be a little less vegan you can easily serve it with gluten free meatballs and/or italian sausage!

Ingredients:
Gluten Free / Dairy Free Baked Ziti with Garlic Bread
1 package of gluten free ziti/penne (12-16oz.)
1 block Vegan Gourmet Mozzarella Cheese (enough shredded to cover top, about 1/3 of the block)

Tofu Mixture:
1 package soft tofu (14oz)
1 tbs dried parsley
1 tsp dried basil
½ tsp garlic powder
¼ tsp oregano
1 cup pasta sauce (for tomato free version click here: Tomato Free Pasta Sauce Recipe)
Salt and pepper to taste

How to prepare:
Boil the ziti as directed but remove when still very al dente (they will continue to cook while baking).  Drain and rinse them to stop them from cooking further.  (GF ziti is hard to find, I used Jovial Penne.)

Meanwhile, in a large mixing bowl combine the tofu, 1 cup of sauce, parsley, basil, garlic powder, oregano, salt and pepper. Hint: crumble the dry spices in the palm of your hand before adding to increase their flavor. Use a whisk to crumble the tofu until it resembles the ricotta cheese used in the dairy version of baked ziti. (Do not use Vegan Gourmet shredded mozzarella in the mixture; it will not melt like real mozzarella unless it is broiled on top at the end.)(If substituting Daiya Shredded Mozzarella, go ahead and add half a cup to the mixture at this point.)

Preheat the oven to 375.


Mix the tofu mixture and drained ziti in an oven safe casserole dish. (Spray the dish first to prevent sticking.)

Bake, covered, for 20-30 minutes until heated through.

Remove from the oven and cover with shredded soy mozzarella.  If using Vegan Gourmet, place under the broiler and broil – watching carefully until shredded cheese begins to bubble. (If using Daiya, just bake another 5-10 minutes.)  Remove promptly once the cheese is melted. (Note – Most other non-dairy cheeses will not melt unless it is broiled as noted above.) [Warning, do not bake the ziti with the mozzarella on top or it will dry out and not melt as much when you broil it, it is better to add after baking.]

Alternatively, you can cut the 1/3 of the block of Vegan Gourmet into pieces then microwave in 30 second increments stirring between each until it is fully melted and hasn't separated.  Then drizzle it over the top of the shells at the end.  Allow it to sit for a minute or two before serving.  (I first read about this method here: The GFCF Experience)

Serves three - four.

Thursday, August 11, 2011

Gluten Free Dairy Free Fettuccine Alfredo Recipe (vegan) with optional Shrimp and Asparagus


A couple of years ago, I was on a kick to duplicate all of the recipes my mother used to make growing up, only this time gluten and dairy free.  One of the toughest was Fettuccine Alfredo.  The recipe below is for making it as a side dish but, I've included instruction at the bottom for adding asparagus and shrimp and expanding it into a full meal.  (This is how I made it last and it was incredible!)

Please note, this recipe makes enough dairy free alfredo sauce for 8oz of pasta however, the recipe easily scales up (by half for 12oz and double for 16oz).

Ingredients:
8oz Gluten Free Fettuccine
1 cup almond milk (you could also use hemp or rice milk but rice milk will take longer to thicken)
2 Tbsp GF flour (any blend should be fine)
3 Tbsp Vegan Parmesan Cheese
3 Tbsp olive oil

How to prepare Vegan Fettuccine Alfredo:
Cook the pasta until al dente.  Unfortunately, I find most manufacturers have an unrealistically long cooking time on the package so you'll have to test for doneness.  Meanwhile in a sauce pan, heat the olive oil over medium heat.  Add the flour and stir until it starts to brown.  Add vegan Parmesan and almond (hemp/rice) milk while continuing to stir. Allow to thicken stirring occasionally. If it finishes thickening before the pasta is done, remove from heat until pasta is done (you'll need to reheat it once the pasta is ready). Drain the pasta and cover with sauce.

Makes 3-4 side dish servings.


Alternate Version

1 pound medium asparagus
1/2 pound cleaned and deveined shrimp

Wash the asparagus making sure to rinse any sand from the tips.  Cut (and discard) the woody part off the bottom of the asparagus (about 2") and then cut into roughly 2" pieces keeping the tips separate.  Boil everything in 2 quarts of boiling salted water.  Cooking times are as follows:

Gluten Free / Dairy Free Fettuccine Alfredo
with Shrimp and Asparagus

Asparagus stalks - 6 minutes
Asparagus tips - 4 minutes
Shrimp - 3 minutes

I just added them to the pot one after another according to their cooking times.  When finished, drain and add to the pasta immediately prior to covering with the alfredo sauce.

Makes two main dish servings.

Note: I considered cooking everything (pasta included) in the same pot and simply adding each according to its cooking time.  There were two reasons I didn't: first, I wasn't sure the exact cooking time of the pasta and didn't want to over cook the shrimp if the fettuccine wasn't done in time and second, adding room temperature asparagus and cold shrimp to the pasta water would drop its temperature and I wasn't sure what affect that would have on the boiling time either.

One final thought: Fettuccine is the proper italian spelling of this type of pasta.  According to dictionary.com, in English there are an additional three possible spellings: fettuccini, fettucine, and fettucini.

Other Gluten Free Dairy Free Recipes You May Enjoy:

Gluten Free Dairy Free Vegan Stuffed Shells

Gluten Free Dairy Free Authentic Arroz con Pollo Recipe (Chicken and Rice)

Tuesday, August 2, 2011

Karina's Quinoa Salad with Yellow Grape Tomatoes, Kalamata Olives, Basil and Mint


GF/DF Picnic - Karina's Quinoa Salad, Raw Vegetables, Cold Chicken Satay,
and Roasted Red Pepper Bruchette on a piece of Schär  baggette.
I've made this summery salad twice recently (once for a picnic before seeing Shakespeare in the Park and the second time for a cookout) so thought I would share.  I can't really do tomatoes so I substituted chopped roasted red peppers instead.

Karina's full recipe is here: Quinoa Salad Recipe with Yellow Grape Tomatoes, Kalamata Olives, Basil and Mint

I highly recommend checking out some of her other recipes - she is one of my favorite GF bloggers!